
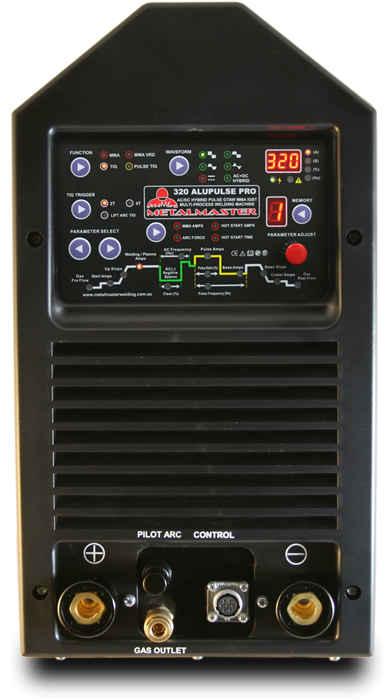
New Alupulse 320 Amp AC DC Pulse Tig Welder for Metalmaster Australia
The Metalmaster 320 Pro is digitally controlled AC DC Tig Welder containing an arsenal of features within a clever digital control interface. The professional features such as high frequency start, up and down slope, pre and post gas flow, start and finish currents, Multiple AC waveforms, AC + DC Hybrid wave, adjustable AC frequency with balance adjustment, adjustable pulse current, pulse duty and pulse frequency, repeat (latch) function and MMA VRD welding. This truly is the ultimate welding power source unit designed for precision AC DC TIG / MMAW welding of all weldable materials. Why spend $1000s more on a European brand when you can achieve the same result with our proven technology. As with all the AC DC Tig welder for sale in Australia from Tokentools, they are backed by an industry leading 5 year warranty.
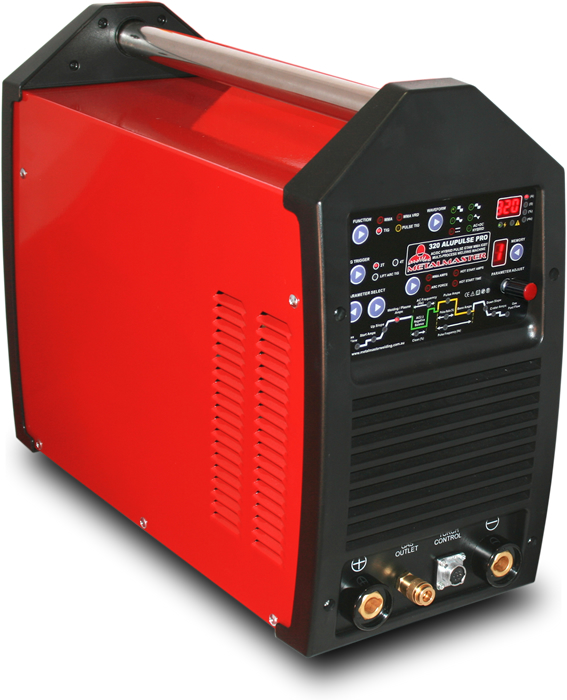
Alupulse 320 Amp AC DC Pulse Tig Welder for Metalmaster Australia
The features in more detail:
AC Wave Manipulation – This unit is capable of providing a square wave, soft square wave, sine wave, trapezoidal wave for welding of aluminium.
AC + DC Hybrid Wave – Whilst pulse Tig welding the welding power source can supply the operator with AC during the pulse cycle and DC during the base cycle. This Hybrid wave allows for welding very thin aluminium at the minimum settings or much thicker aluminium at the upper settings. DC injection during an AC welding cycle increases heat input dramatically.
Huge AC & DC Pulse Frequencies – Our 32 Bit Microprocessor design allows for 0.1 to 250 Hz Pulses in AC and 0.1 to 500Hz pulses in DC.
Enhanced MMA Welding – Now featuring MMA with VRD on or VRD off, Hot Start amps, Hot Start timer and Arc force, weld like a pro in MMA.
FOD (Fan on Demand) – The fan runs as required. Once the welding stops, the fan timer spools down the high speed fan and allows the operator to think with a clear head. Silence is golden.
Quick Disconnect – Front and rear connections have a quick disconnect so packing up and moving takes seconds.
Welding For Dummies – No need to buy the book, we have added some failsafe settings that get you unstuck if you muddle up the controls. Simply select A for Ally or F for Ferous from the memory chanels and pre load our expert settings, just adjust the amps to your requirement and weld with ease.
Pre Gas Flow – Pre gas flow allows the operator to set the amount of gas flow in seconds that is required before the Tig welding arc is activated. This is ideal for purging pipes etc before welding.
Start Amps – Hot start for TIG, this sets the amount of amperage that is provided upon pressing the Tig torch trigger. This function is used in 4T mode as initial welding current or in 2T mode as the minimum start current to heat up the tungsten.
Up Slope – Increases the output amperage from the start amps setting to the welding amps setting over the time set. For example, if start crater is 30 amps and welding current is 70 amps with 5 seconds up slope time you would experience the welding arc as follows. Upon pressing the Tig torch trigger in 2T mode the current would start at 30 amps then grow steadily for 5 seconds until it reaches 70 amps. In 4T mode upon pressing the trigger the current will start at 30 amps, when the trigger is released the current would steadily increase for 5 seconds until it reaches 70 amps.
Welding Amps – This is the welding current used for non pulse welding in Tig or MMA for DC and also AC modes.
AC Balance – This setting is critical for aluminium welding and determines the amount of time electrons flow from the job to the tungsten (cleaning) as opposed to tungsten to job (penetration) as a percentage of total AC cycle. For example if set to 40%, the electrons will spend 40% of the AC welding cycle flowing from the job to the tungsten electrode and the opposite value 60% flowing from the tungsten to the job. This in effect gives an additional penetration gain over machines without balance control.
AC Frequency – The AC frequency setting changes the amount of AC cycles that occur each second. More alternating cycles has the effect of narrowing the arc which in turn increases penetration. Lowering the AC frequency broadens the arc so is ideal for internal corners.
Pulse Amps – When pulse welding thin sheet or thin walled tubes pulse welding is a technique that is used to reduce the amount of heat that is provided to the weld as an average but increases the heat provided during pulse cycles. In effect this provides better penetration whilst reducing distortion. The pulse welding current is set at a value that can penetrate the full thickness of the material and form a weld pool.
Base Amps – Base amps is used during the pulse welding procedure and sets the background current. In effect the base amps control sets the amount of amperage that is provided between pulses and this amount must be set sufficiently low that it allows the material to cool and solidify. As it is not practical to extinguish the welding arc in between pulses, the base current effectively keeps the arc active but does so at a value that will not affect the weld pool.
Pulse Ratio – The pulse ratio is the proportion of time the welding arc will pulse as opposed to not pulse. If set at 50% there will be a pulse and base current applied in equal proportions. If set to 20% there will be a pulse for 20% of the cycle and a base current for 80% of the cycle. An example of what is occurring may be calculated as follows. We may be welding 2mm sheet so could set the pulse current at 80 amps and base current at 20 amps. In normal operation an 80 amp welding current would blow a hole right through the 2mm sheet however in pulse welding mode we can pulse the 80 amps at say 30% of the time and have our base current of 20 amps for 70% of the time. The result is (80 x 0.3 = 24) + (20 x 0.7 = 14) = 38 Amps. You could not weld the material at 38 amps no matter how hard you try however using pulse welding techniques it is easy to achieve excellent penetration and do so at a reduced AVERAGE welding current.
Pulse Frequency – This is how fast the pulses repeat each second. Increasing pulse frequency can again narrow the arc slightly thus increasing penetration as the welding arc energy is concentrated into a smaller zone.
Down Slope – This is the opposite to up slope in that it decreases the output welding current over time until it arrives at the final crater current value.
Post Gas Flow – Post gas flow is used to keep the tungsten welding electrode immersed in an inert gas shield whilst it is hot. If you do not whiled the electrode it will oxidise in the atmosphere due to it’s heat when it comes into contact with oxygen. You may also hover over the weld bead during the gas post flow period to keep it shielded whilst it cools down.
Parameter Buttons
Wave – For Tig welding processes, this push button selects AC welding current or DC welding current. In MMA stick welding procedures you may press the WAVE selector in order to toggle the output welding current polarity. Switching from electrode positive to electrode negative simply requires a push of this button.
Trigger – 2T or 4T selection is made by pushing this button.
In 2T mode pressing the torch trigger will initiate the pre gas flow, start the arc at start crater value, up slope, provide welding current. Releasing the button will provide down slope until final crater current value, extinguish the arc and then provide gas post flow.
In 4T mode pressing the torch trigger will initiate the pre gas flow and start the arc at start crater value. Releasing the torch trigger will up slope and provide the set welding current. At this point you will note the operator does not need to hold the torch trigger to continue welding. Pressing the Tig torch trigger again will provide down slope until final crater current value is reached. Releasing the Tig torch trigger will extinguish the arc and then provide gas post flow.
The “T” represents a change in trigger value so a push and release as in the first example is two changes hence the term 2T. In the second example the welding torch trigger was pushed, released, pushed, and released again. This was four trigger change of states hence the term 4T.
If using a variable amps remote control that is torch mounted you must do so in 4T. You simply press and release the trigger so that you do not need to hold it whilst welding. This leaves your finger free to control and vary the welding amperage of the machine. To stop the welding process simpley press and release the gig torch trigger again.
Tig / MMA Welding Mode – This push button selects the welder’s operating mode. You may select Tig welding, Pulse Tig welding and MMA / Stick welding.
Parameter Select – Pushing these buttons allows the operator to select the many adjustable parameters that are represented by an illuminated LED along the welding function line in the centre of the panel.
Parameter Adjust – This rotary encoder is used to change the value of any selected parameter. Turning will increase or decrease the value in increments of one. For increased speed of adjustment, pushing the knob whilst turning will change values in increments of 10.
Tig Start – The Tig start selector is used to inhibit the HF Tig start circuit. The operator may toggle between HF Tig start and Lift Tig start.
Memory – Memory functions are available to store settings. Use it to save favourite set up when jobbing.
Metalmaster welding machines come standard with a 5 year parts and labour warranty. All IGBT transistors are manufactured by Infineon, chosen for their ability to provide dependable power in the toughest of environments. With the Metalmaster Alupulse 320 Pro you will have one tough inverter AC DC TIG MMA welder ready to attack and conquer any welding job you put to it.
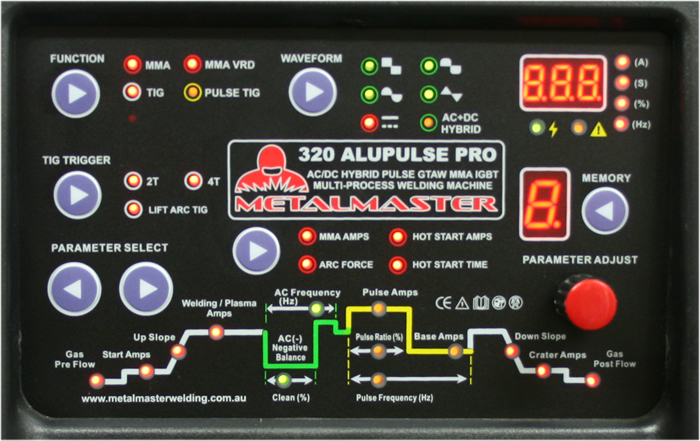
AC DC Pulse Tig Welder Metalmaster 320 control panel
2 comments on “320 Amp AC DC Pulse Tig Welder”